Base cabinets are a lot like wall cabinets, but with one extra step. Assembling them is a breeze when you know what you’re doing. Learn how to assemble base cabinets in 5 easy steps.
How to Assemble a Base Cabinet - In 5 Easy Steps
Base cabinets are the cabinets you will be in contact with the most when your kitchen is complete. Having a sturdy base cabinet is incredibly important, so it’s a good idea to make sure that you’re putting them together correctly before you start. To get started with assembly, we recommend having a mallet, Philips head screwdriver, box cutter, and some glue handy. Remember to keep your box so you can use it to protect the surface of your cabinets, of course and shop for the best rta cabinets if you still haven’t yet.
In this post, you will learn:
- How to assemble base cabinets
- What tools you will need to assemble RTA cabinets
- How long it takes to put together RTA cabinets
- How easy it is to put together RTA cabinets
 1.
1.
Assembling the Cabinet Box
Lay the face frame of your cabinets faces down on your work surface. Once in place, run a line of wood glue down each of the dados that run vertically and horizontally on your face frame. Once you have all of your glue in the dados, you can start attaching each of the side and bottom panels one by one.
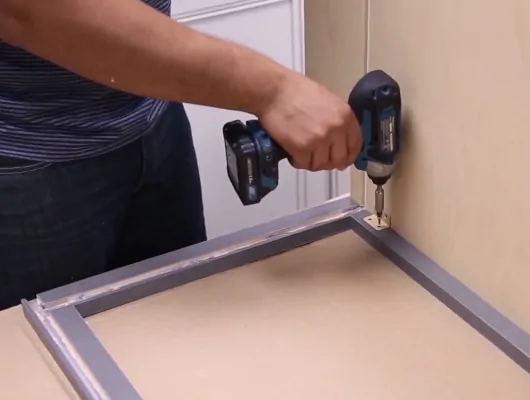
Start with a side panel by setting it into the dado and attaching two L-brackets where the pre-drilled holes are located on your face frame and side panel. Do the same for the other side panel, before sliding your bottom panel into the side panel and face frame dados. The bottom panel will be secured to each of the side panels using one L-bracket per side. Attach one bracket to each side panel but do not attach the bottom panel to the L-brackets just yet, we have to set our back panel in place first.
 2.
2.
Installing the Back Panel and Toe Kick
Once you have the three panels mounted on the face frame, you may install the back panel. This can be done by carefully moving the side panels out a bit to allow for the protruding rabbit joint to slide into the dados that run along the backside of the cabinet on each of the side panels. After your back panel is properly seated, it should be secured to the bottom panel with one-inch screws. At this point, you should finish attaching the bottom panel to the side panels using the previously installed L-brackets. Flip your cabinet over to lay on the back panel and add two more L-brackets to the inside of the cabinet to attach the side panels to the back panel.
While your cabinet is still laying on its back, it’s a good idea to attach your drawer brackets, corner blocks. Simply drop the brackets into the holes on the back panel and attach them with a single screw. The corner blocks should be positioned at the top of your face frame above where your drawer will sit. Each corner block will be attached at a corner with two screws. Lastly, attach two L-brackets to the toe kick on each side so that the toe kick can then be set in place and attached to each of the side panels from the underside.
 3.
3.
Assembling the Drawer Box
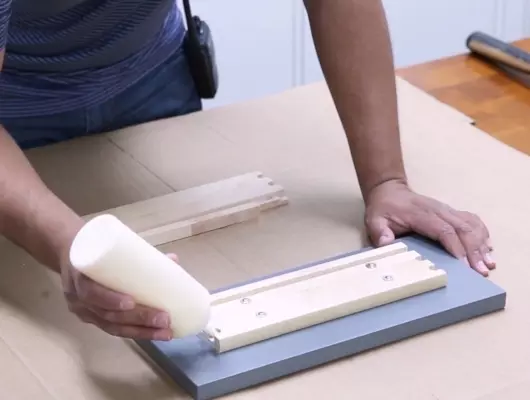
Start by applying some glue to all of the female ends of the dovetail joints. These will be located on the drawer face and the back-drawer panel. Attach the sides of the drawer box to the drawer face by sliding the dovetail joints together and tapping the joint with a mallet to make sure it is tight. Slide the bottom panel into the dado before installing the back-drawer panel, once again tapping each joint until fully seated.
 4.
4.
Installing the Drawer Box
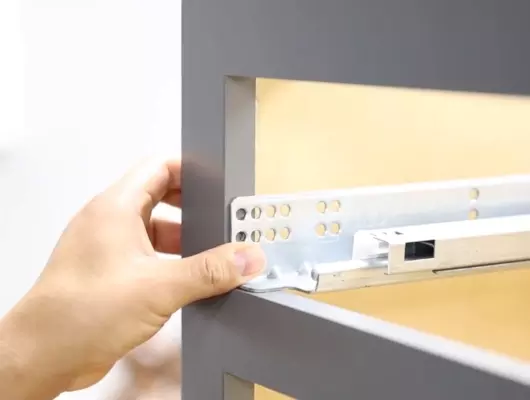
To install your drawer into the cabinet, you must first attach the clips to the drawer box. Flip the drawer box upside down and attach each clip to the front end of the underside where the pre-drilled holes are located using 3 screws. Next, install your drawer glides by extending them to the back of the cabinet where your glide brackets were previously installed and attaching them to the face frame with screws. Now all that is left, is simply to slide the drawer box onto the glides until they click into place.
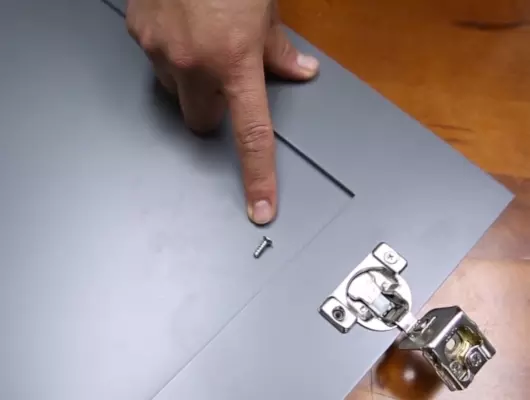 5.
5.
Installing the Door
Door installation is extremely simple. Drop your door hinges into the cup holes, cup side down, and screw them into the door. Then locate the pre-drilled holes on the face frame where your hinges will be attached and screw the hinges to the face frame. Add bumpers to the corners of your door to protect your face frame from unintentional slams.